If Parameters is your forte and you’re keen on enhancing the reusability and manageability of your Bicep deployments, then you’ve come to the right place. In this blog post, we’ll dive into a method that will elevate your Bicep deployments with Azure Pipelines to the next level.
Azure Pipelines is your ally for streamlining your CI/CD workflows, and it seamlessly integrates with Bicep to ensure consistent Azure resource deployments. With the use of pipeline Parameters, you can craft adaptable and reusable deployment scripts that’ll definitely save you valuable time and effort.
What are the Parameters?
First, what are the parameters in the context of Azure Pipelines? Parameters allow you to pass values or configuration options into your pipeline runs during runtime. These can customize your deployment scripts without altering the core Bicep files, making your pipelines more versatile.
Why Use Parameters?
The beauty of using Parameters in Azure Pipelines is that it enables you to create templates for your IaC deployments. This means you can define your deployment’s foundational structure and then use Parameters to tweak specific settings for different environments or applications. It keeps your Bicep files clean and focused while offering customization where it’s needed.
Setting Up Parameterized Bicep Deployments
Here’s how to set up parameterized Bicep deployments in Azure Pipelines:
1. Define your Parameters in the Bicep Template: In your Bicep file, you can declare Parameters using the param keyword. For example, you can define a parameter for the resource group name, location, or SKU.
param name string
param location string

resource rt 'Microsoft.Network/routeTables@2023-02-01' =  {
  name: name
  location: location
}
2. Create your Azure Pipeline: Set up your Azure Pipeline as you normally would. Make sure to include the Bicep file in your source repository.
3. Define Pipeline Parameters: In your Azure Pipeline configuration, specify the Parameters that you wish to pass values to. This can be accomplished by including a “parameters” section in your YAML file.
Firstly, add the parameters block along with the desired configuration, positioned before your stages, tasks, and jobs:
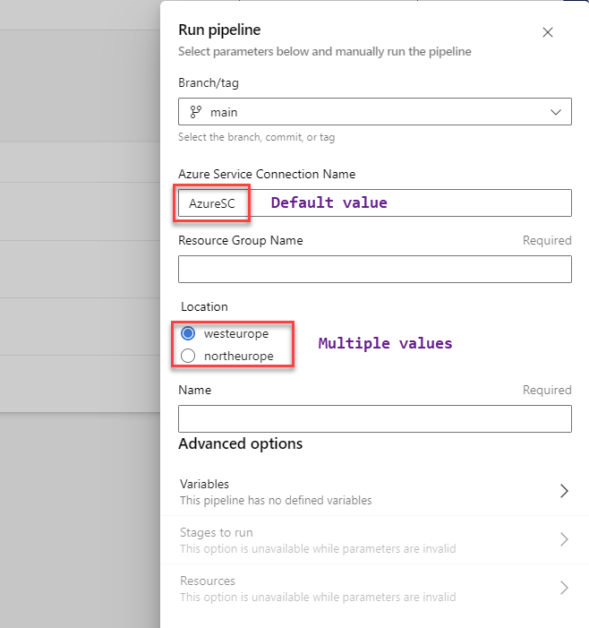
parameters:
  - name: ServiceConnectionName
    displayName: Azure Service Connection Name
    type: string
    default: AzureSC
  - name: ResourceGroupName
    displayName: Resource Group Name
    type: string
    default: ''
  - name: Location
    displayName: Location
    type: string
    default: westeurope
    values:
    - westeurope
    - northeurope
  - name: Name
    displayName: Name
    type: string
    default: ''
Secondly, incorporate these parameters within the task using the format ${{ parameters.keyName }}, like this:
- stage: Validate
  jobs:
  - job: ValidateBicepCode
    displayName: Validate Bicep code
    steps:
      - task: AzureCLI@2
        name: RunPreflightValidation
        displayName: Run preflight validation
        inputs:
          azureSubscription: ${{ parameters.ServiceConnectionName }}
          scriptType: 'bash'
          scriptLocation: 'inlineScript'
          inlineScript: |
            az deployment group validate \
              --resource-group ${{ parameters.ResourceGroupName }} \
              --template-file ./main.bicep \
              --parameters location=${{ parameters.Location }} name=${{ parameters.Name }} \
4. Providing Pipeline Parameters at Runtime: Simply trigger your pipeline deployment and then input the necessary parameter values to tailor the process to your specific requirements.

In conclusion, by implementing this setup, you’ll be able to execute parameterized Bicep deployments seamlessly within Azure Pipelines. Additionally, with proper configuration, you can reuse pipelines as templates between Azure DevOps Projects. This approach not only enhances compatibility but also fosters smoother integration with various Azure services and collaboration between teams, elevating the efficiency and versatility of your deployment workflows.
Let me know what you think in the comments below.
Thanks for reading my blog!